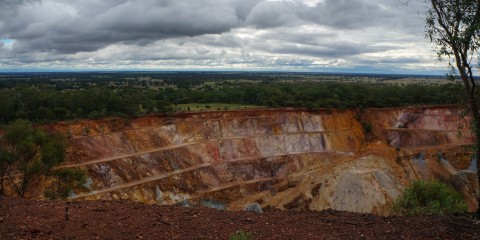
The Peak Hill is an old gold mine that operated from the late 1800’s to the early 1900’s. In total the mines produced 60,000 ounces of gold! It has been a long time since them mines operated so now The Peak Hill Mines provide a great hiking experience while enjoying the history of the mines and the surrounding nature. Stop by on your way down the Newell Highway and enjoy some great views. You might even see a kangaroo or a wallaby, we did!
The Peak Kill Open Cut Experience is a hike off the Newell Highway. Unless you are a local you will need a car, however it is worth a stop to get our of your car and stretch those legs! Coming from Dubbo make a left onto Mingelo Street and head strait to the car park. Don’t worry there are signs on the Newell Highway, so you can’t miss it!
While some may say the Newell highway is bland compared to the coast, we think it has a lot of charm. Its like going back in time and seeing how another part of Australia lives. So if your driving from Melbourne to Sydney or Melbourne to Brisbane its worth taking the Newell Highway and seeing all the sites on the way.
There are 4 trails that we will describe. The local town has put together a map which you can get HERE. All trails start and finish at the car park and are well marked.
Distance: 1.4km
Time: 45-60 mins
Marked gold on the map, this trail is one of the more popular ones due to its views and time needed. Follow the trail to the left keeping the Proprietary Open Cut on your left hand side. As you continue onward you will have some amazing views of the town and the pits. As you continue upward you will reach the Parkers Open Cut. Take some pictures here before continuing on to the high wall lookout over The Great Eastern Open Cut.
After passing The Great Eastern Open Cut we will be heading down to the Crown Pit which we will pass on our left. From here its mostly downhill along the marked trial and finally passing the Bobby Burns Open Cut on our right and the 30 tonne boulder on our left. Wrap around Bobby Burns and follow the trail heading back towards the car park.
Distance: 2.3km
Time: 1.5 Hours
Marked blue on the map, this trail provides the best overall view of the pits. Its very well marked and considered the main trail. There are also a few benches on the way for resting and sightseeing. From the entrance follow the trail to the far left and putting the Proprietary Cut on your right hand side. Continue onwards passing the Proprietary Cut and you will soon pass the parkers cut on your right. Stop along the way to grab some amazing pictures of these two pits. As you continue on you will soon pass the Great Eastern Pit and will be heading back down towards the car park.
Optional Detour: Instead of heading down you can follow the drill trail, marked green on the map, for a relatively flat descent. It will add 30 mins to your journey though. If you are in a rush you should stick with the steeper Dumper Trail.
If you decided to stick with the the Dumper Trail follow the trail posts and keep the three pits you just passed on your right. Continue downwards until you reach the entrance and the car park.
Distance: 1km
Time: 30 mins
Note: Unmarked on online map. Local map shows grey color.
Marked grey on the map, this trail provides the best option for those in a rush. It provides great lookouts of the old mines and allows you to get up on your feet. Starting from the entrance bear left and take a short climb up to the first viewing platform for the Proprietary Open Cut. After you will follow the signs to the bridge walk. Head over the bridge to the lookout for the Crown Open Cut. After a view pictures cross back over the bridge and follow the trial to the Bobby Burns pit. After passing the pit continue onwards back to the car park.
Distance: 1.6km
Time: 45-60 mins
Marked red on the map, this trail provides great views of the Bobby Burns and Crown Pits. Its a short walk and great for those who don’t want to work up a sweat. Starting from the entrance head to the right and follow the trail around the south side of the Bobby Burns pit. You will shortly pass a 30 tonne boulder of gold bearing ore. Looters be ware, there is only about 2oz of gold within the boulder. After passing the boulder climb up through the bush as you pass the Crown Pit on your left. You will soon reach two high wall lookouts which provide great views of the Crown Pit and the city of Peak Hill.
Once you have your pictures head past the picnic area and over the bridge walk. Continue heading downwards and the Bobby Burns pit will be on you left. You will reconnect to the trail you started on and will shortly be back in the car park.
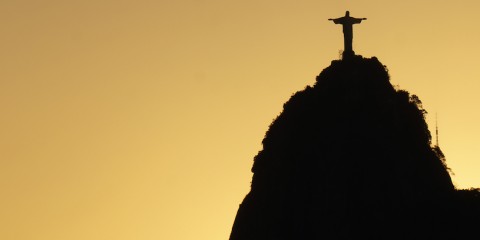
Sugarloaf arguably provides some of the best views in Rio de Janeiro. A cable car can take you to the top at 396 m/1,299 ft. Sugarloaf consists of two mountains. The smaller is named Morro da Urca, while the larger is Pão de Açúcar. To get to the top of Sugarloaf you need to take a cable car, but if you wanted to get some exercise it is possible to hike Morro da Urca and see those amazing views.
There are a few buses that go to Sugarloaf. You can get the 511, 512, 107 or X which will drop you off near the base of Sugarloaf. Sugarloaf consists for two peaks with a cable car to each peak. However, this being a hiking guide, you can hike to the first peak for free. As for May 2014 there is no way to get from the first peak to the second peak without starting from the bottom. The views from the first peak are just as good so don’t feel like you are missing out. If anything you are saving R$62 for the cable car ride!
If you are facing directly in front of the cable car entrance do a complete 180 and head to the back right corner by the military post. Here will be a gated entrance, likely with a guard or two near by, that you can take. Soon after entering you will see a dirt path heading up the mountain. This is the path you will need to take to get to the top of the first mountain, Morro da Urca.
Short Detour: If you skip the dirt path and stay on the paved path you will reach a dead end after 1-2km. However, there are some small monkeys on this path so it might be worth taking a short detour for a picture or two.
The height of Morro da Urca is 220m and the path is somewhat steep. Its also not very well laid out so expect it to be slippery after heavy rain fall. Once you reach the top of the path continue left to get to the lookout point at the top. Here there are free toilets, water fountains, food stands and the other cable car to the higher Pão de Açúcar. Keep in mind, you won’t be able to take this without a ticket from the bottom.
Note: The path closes at 6pm so to get back down you will have to use the cable car. It is free though after 7pm, so time your hike appropriately. It does provide amazing views of the sunset, so it is worth staying at the top and waiting for the free ride down!
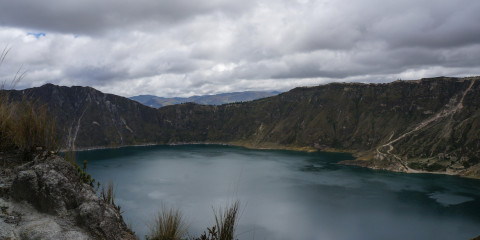
Up in the mountains of Ecuador lies the Cuicocha Crater Lagoon at the base of the extinct volcano Cotocahci. The lagoon reaches a peak of 3240m and provides amazing views of Otavalo and the mountainous region. In the center of the lagoon lies two lava domes populated with wildlife and covered in vegetation. A 4-5 trail leads around the lagoon and provides some of the most amazing views of the crystal like lava water. Take your time and use our guide to enjoy your trip to Laguna Cuicocha.
There are no buses up to the Laguna so you will need to take a bus and then a taxi to get to the crater. Starting at the Otavalo bus terminal take a bus to Quiroga (.25 cents). From here you will need to take a taxi to Laguna Cuicocha. It should be about $5 to take a taxi, so make sure you try and bargain with the taxi driver.
Hiking around the crater takes 5 hours at the most, so unless you want to take the boat ride to one of the islands you should ask the taxi driver to come pick you up in 5 hours. Otherwise you can ask the lodge to call you one so you can get back down.
Hiking Laguna Cuicocha can be done either clockwise or counter clockwise. We have done both and didn’t feel one was easier then the other, so our guide will be counter clockwise since the beginning of the trail is well marked unlike going clockwise.
From the main lodge head up pass the car park and follow the road to the visitor center. Near the visitor center is the begging of the trial going up and around the crater. You will take this trail and this is the trail you will follow around the crater. The trail is very well marked and provides amazing views of the lagoon. Along the way there will be two coverings where you can take a few minutes to rest, enjoy lunch or a snack, and provide shelter from the sun or rain. Plus the picture opportunities are amazing!
After the last covering the trail leads down and around the crater and the views of the lagoon start to disappear. Continue following though until you reach the (now) paved road. Follow this road down the hill until you reach a restaurant on your left hand side. The restaurant will advertise a “mirador”, food and other services. However, we need to go up here as its the way back to the lagoon! Hike up the short road to the restaurant and right in the back is a path leading down to the main lodge where we started.
Once back at the lodge you can get some coffee while waiting for a taxi to come and pick you up. Or if you have time you can catch a boat ride to the center islands and enjoy the lagoon even more!
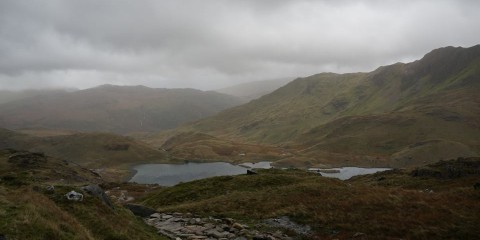
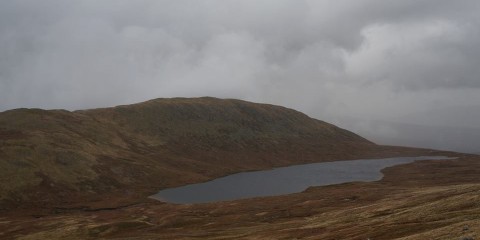
Snowdon is the highest peak in Wales and part of the three peak challenge! The three peak challenge consists of hiking the three highest peaks in Scotland, Wales & England in 24 hours. While thats a bit crazy it is fun to do on a long weekend! The most common place to start the hike is from Pyg Track .
You have two options to get to the Pyg Track of Snowdon. Driving will put you at the start of the track but will set you back £10! The other option is to grab the Sherpa bus from Llanberis High Street for £1. For either choice you want to go to the Pen Y Pass car park where the Pyg Track starts its ascent to the top of Snowdon.
You should start your hike as early as possible as the weather can quickly change and often it can get dark very fast. The visibility is low at the top of the mountain so the more light you have the better. Summer months are the best due to the snow that accumulates at the top of the mountain during the Fall and Winter.
Head to the top right of the Pen Y Pass to start on the Pyg Track up Snowdon. The path is mostly a rock path leading to the top of the peak. Follow the stone path from the start of Pen Y Pass going over various stone steps and to beautiful views of the lake. As you progress upwards the stone layout is much cleaner. 30 mins before the top is a large stone that marks the joining of the miners track. Continue following the path up the mountain
At the base of the final ascent is another large stone that marks the joining of the Llanberis and Ranger Path. Keep following the path up the mountain until you reach the top.
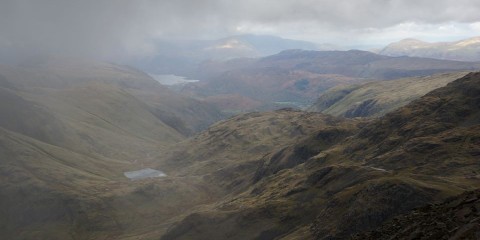
Scafell Pike is the highest peak in England and part of the three peak challenge! The three peak challenge consists of hiking the three highest peaks in Scotland, Wales & England in 24 hours. While thats a bit crazy it is fun to do on a long weekend! The easiest place to start the hike is from Wasdale Head. Though the mountain is remote the views are breath taking.
The only real way to get to the base of Scafell Pike is by car. There are no local buses or public transportation that drop you off at the base. The post code for Scafell Pike is CA20 1EX. This brings you to the Wasdale Head, one of the easier trails to start your hike up to the top.
You should start your hike as early as possible as the weather can quickly change and often it can get dark very fast. The visibility is low at the top of the mountain so the more light you have the better. Summer months are the best due to the snow that accumulates at the top of the mountain during the Fall and Winter.
From the Wasdale Head free car park, follow the road to the footpath. Here you will see a footbridge that you must cross. Then continue onwards along the path to Lingmell Gill. Once at the post for Lingmell Gill bear to the left and head uphill. You will then cross a river and pass on to Brown Tongue. From here continue on the trail till you are at the peak of Scafell Pike.
In the end the trail is well marked and chances are a lot of people will be hiking, especially on the weekends. So get there early before to get a parking spot and beat the crowds!
Ben Nevis is the highest peak in the Great Britain and part of the three peak challenge! The three peak challenge consists of hiking the three highest peaks in Scotland, Wales & England in 24 hours. While thats a bit crazy it is fun to do on a long weekend! The path to the top is well marked and often called the Pony Track. Ben Nevis is the highest, longest and hardest of the three peaks but the views make it so worth it.
The easiest way to get to Ben Nevis and also doing the three peaks is by hiring a car. However, if you only want to hike Ben Nevis then take a train up to Fort Williams, the closest town. Here you can take the local bus or walk to the Glen Nevis Visitor Centre. There are no direct buses, however you can get one that drops you off near by. Check the time tables at the rail station or ask there for more informations as the bus schedule changes frequently.
You should start your hike as early as possible as the weather can quickly change and often it can get dark very fast. The visibility is low at the top of the mountain so the more light you have the better. Summer months are the best due to the snow that accumulates at the top of the mountain during the Fall and Winter.
The trail to the top of Ben Nevis is commonly referred to as the ‘Tourist Route,’ the ‘Tourist Track’ or the ‘Pony Track’. The Pony track is the simplest way to toe the of the mountain as well as the most popular.
From the tourist center, walk towards the opposite end of the car park and follow the bridge to the start of the path. The path is very well marked and very visible for the first half.
Half way up, at Lochan Meall an t-Siudhe, the path is mostly rock. The rocks get wet and often the visibility is low at the top depending on the weather. Be careful as it is easy to trip and twist and ankle or even worse. Once you reach the top you will see the old abandoned observatory as well as a World War 2 memorial.
Once you are ready you take the same path down, sticking to the trail and watching out for slippery rocks on your descent.
Mount Olympus is the highest mountain in Greece standing at 2917 m high. The mountain has about 52 peaks and multiple trails leading around the mountain. However, the E4 trail leads you to Mytikas, the highest point of the mountain . While the climb isn’t difficult you will be using your hands and crawling a bit at the last part. You will need about 6-8 hours to finish the climb in one day, so start early and be prepared. We did the hike in running shoes, but we did see a few people climb the mountain in flip flops!
Its best to stay in the town of Litohoro the night before. It is one of the closest towns and provides easy, but not cheap, access to the mountain. The day before you should arrange your transportation for the next morning. If you go to the taxi rank at the top of the town talk to any of the taxi drivers and tell them what time you would like to leave and they will be there the next morning. The price is €25 one way and if you are going to do the hike in one day you should aim to leave around 6 AM. The taxi driver will drop you off in Prionia, where you will start your hike up the mountain. Make sure to get a card so you can call them to pick you up!
After arriving to Prionia walk past the bottom restaurant and enter the trail. You will be following the E4 trail up to Refuge A. From Prionia to Refuge A is about 6 km and 2.5-3.5 hours. The hike twists and turns as it climbs up the mountain with varying terrain and scenery.
Once you reach Refuge A you can stock up on water or get some food and snacks. The prices are reasonable based being in the middle of a mountain and knowing all the supplies have to be brought up via donkeys. We’ve certainly seen higher in less remote places!!
From the back of Refuge A is the path up to Skala. Its about 3 hours and the terrain can be fairly steep. The trail is very well marked though and all you need to do is stick to the path.
Once you reach Skala you have two choices on which way you would like to continue. To your left is the way to Skolio, the second highest peak on Mount Olympus at 2912 m. Its about 20 minutes to Skolio and very simple, making it easy for anyone afraid of heights or kids.
To the right is the way to Mytikas, the highest peak on Mount Olympus at 2917 m. This is classified as a YDS class 3 rock scramble and might not be the easiest for the unexperienced or ill prepared. It is doable without hiking boots but as always its at your own risk. We haven’t heard of anyone getting hurt or stuck, but things change everyday. This way will take about 45 minutes to get there and back.
Once you make your way back from either peak head back down the mountain towards Refuge A and then back down to Prionia. Here you can ask the restaurant to call your taxi driver to come and pick you up and grab a cold beer while you wait.
Within the Andes of Ecuador likes the Quilotoa loop. Trails and dirt roads lead you between the various villages of Ecuador all while providing some of the most amazing views.
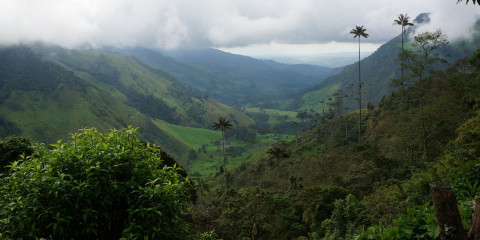
A short trip from Salento, Colombia lies a beautiful valley filled with native wax palm trees and picturesque views. Hiking the Valle de Cocora isn’t particularly challenging but there are a things to know before you start on your adventure.

Australia

South America

South America

Europe

Europe

Europe

Europe

South America

South America